Installation
The below section deals with issues regarding the vehicle which are necessary to take into account for the installation of the amplifier. You’ll save time by planning the system layout and wiring in advance. Please ensure during this preparatory time that the whole settings remain accessible once the installation is complete.
Before starting the installation, please follow these rules carefully:
- After reading the whole manual, be sure that you have understood all the instructions before installing the amplifier.
- Disconnect the battery’s negative wire before starting the installation. (pic. 1).
- To facilitate the assembly, we strongly recommend you unwind all the wires before installing the amplifier.
- Put aside all the RCA cables, speakers, REM and REMOTE CONTROL {REMOTE CONTROL only with FPS 1500, FPS 2300RX and FPS 4160}, far from the power cables in order to avoid any interference
of the signal. - Use quality connectors to ensure a reliable installation and to minimise any losses of signal or power.
- Think carefully before drilling anything. Be extremely careful not to cut or drill the petrol (fuel) tank, the fuel, brake, hydraulic or vacuum pipes, as well as the electrical wiring.
- Never route a wire under the vehicle. It is absolutely imperative to install them inside the vehicle for better protection. While routing the wires, verify that they do not impair the driving of the vehicle. Cables obstructing or routing through areas such as the steering wheel, pedals (brake, accelerator and
clutch, etc.) may be extremely dangerous. - Avoid routing wires above or through sharp rims. Any wire routed through metal must be protected with a grommet. Route the wires well away from mobile parts (seat rails,…) and from sharp or pointed cutting edges. This will avoid catching or damaging the wires.
- Always protect the battery and electrical circuit from potential damages with the help of fuses. Install a
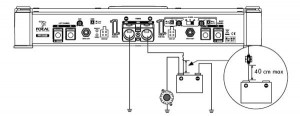
fuse holder and suitable fuses on the 12V positive (+) power cable at less than 40cm from the battery terminal. Ideally, this abovementioned distance should be the shortest as possible (pic. 4). - Prepare the chassis ground by scraping any trace of paint on the metal surface in order to ensure correct grounding. The grounding connections should also be as short as possible and ALWAYS connected to the metal welded to the body or the chassis of the vehicle (pic. 4). The generally chosen ground point is the one that ensures the link between the negative terminal of the battery and the chassis of the vehicle.
- NEVER install this product in the engine compartment of the vehicle. This will cancel the guarantee.
The following installation applies to the FPS (Focal Power Symmetric) range however the stages described here are very similar for all amplifiers when fitting your vehicle with a sound system. These installation instructions are of particular interest if you are planning to embark on the installation of your Car Audiophile amplifier!
1 – Set-up and wiring
Where to install the amplifier?
The amplifier power is such that substantial heat is generated when it is operation. This is why the amplifier has to be placed in a well-ventilated area of the car.
2 – Fixing the amplifier
The surface onto which you want to attach the amplifier (boot of the car, etc.) may not be smooth enough (due to bumps, ribs, etc) to make it easy or even possible to fasten the amplifier. If this is the case, we recommend that you mount the amplifier and its attachment system on a wooden base – i.e. MDF, plywood – which itself is attached to the surface in question.
- Position the amplifier at the desired location.
- Mark the location of attachment holes using appropriate means – i.e. an indelible marker, a screwdriver, etc.
- Make sure that there is nothing below the surface which could be damaged during drilling – i.e. tanks, bundles of cables, etc.
- Remove the amplifier, making sure that you are using a 3mm-diameter drill bit, and then drill.
- Put the amplifier back into the initial position you chose for it. Attach the amplifier using the four self-tapping screws supplied.
WARNING
Think carefully before drilling anything. Be extremely careful not to cut or drill the petrol (fuel) tank, the fuel, brake, hydraulic or vacuum pipes, as well as the electrical wiring.
3 – Wiring Warning
- If there is a doubt about your ability to install the amplifier and to cable the system properly, get a Focal distributor to do it for you.
- Avoid routing power supply cables close to low-level input cables (RCA), to your car’s radio aerial, or to sensitive units. High-current power supply cables can cause static/interference that affects audiosignals.
- Before you begin the connection phase of set-up, remove the vehicle battery’s negative (-) terminal (pic. 1).
3.1 – What power supply wire gauge should I use?
Isolate the cable
Route the low-level audio cables (RCA cable), the loudspeaker cables, the REMOTE cable, as well as the REMOTE CONTROL cable {REMOTE CONTROL only with the FPS 1500, FPS 2300RX and FPS 4160 references} ensuring to isolate them from powerful automobile accessories, particularly electric motors (windshield wiper,…). Keep the whole length of the cables, which will be adjusted later on.
Positive power
Route the positive power cables (+). Make sure when doing so to route them opposite the cables that you have previously drawn – this is to avoid any interference. DO NOT CONNECT THE CABLE YET.
Negative power
Get hold of the negative power cable. This cable should be as short as possible and ideally should not be any longer than 1 metre, to ensure effective coupling between the amplifier and the car’s chassis. Find a suitable ground point, then sand it to remove any traces of paint or other covering and in so doing optimise the contact point. Pierce the metal that you have previously sanded, making a hole the same size as the screw you are using, making sure that there are no tank cables or any other sensitive vehicle devices nearby. Strip 1cm of cable (pic. 3) and then tin it. Screw the cable firmly down onto the amplifier’s GND terminal. Tin the other end of it and then crimp or weld it onto the terminal lug provided. Insert the terminal lug in the screw, and then put the screw and the nut in place and firmly screw-drive in.(pic. 4).
Connection phase
You can now start the connection phase of the RCA, REMOTE and speaker cables. Connect the RCA cables to the amplifier (pic. 5). When connecting RCA, be careful to respect the polarities (INPUT Left = black or white, INPUT right = red). Then connect the cable(s) to the car radio.
If the car radio is not equipped with RCA outputs, high-level to low-level adapters (speaker outputs that are used as RCA outputs) are available from all Focal distributors. These adapters will enable the cables to be connected via the car radio’s speaker outputs instead of the requisite RCA outputs, which they replace.
Now connect the REMOTE cable to the amplifier (REM terminal) screwing tightly. Connect the other end of the REMOTE cable to the car radio REMOTE terminal. Finally, connect the speaker cables to the amplifier and make sure the polarities are correct (+ with + ; – with -) by stripping 1cm of cable (pic. 3) Connect the REMOTE CONTROL cable {only with the FPS 1500, FPS 2300RX and FPS 4160 references} to the amplifier, then fix the remote control in the spot made for it (except for the FPS 2160 model).
Power supply cable
Get the positive (+) power supply cable ready for connection to the amplifier by removing 1cm of the plastic coating from the end of it (pic. 3). Tin this part of the cable using a soldering iron and tin the wire. Insert the plastic-free tinned part of it in the amplifier’s “+ BATT” terminal, then secure the cable in place by screwing it in tightly.
WARNING:
The cable that links the positive (+) terminal to the battery at the amplifier’s “+ BATT” binding post terminal must ABSOLUTELY be fused (see current ratings listed in the table on page 30) not more than 40cm from the vehicle’s battery. The connections on the fuse-holder must be fully insulated.
Installing the fuse holder
The implementation phase of the fuse holder for a safe installation can now be started. The fuse holder should be linked at both end of the positive (+) power cable. It should be placed close to the battery {10 to 40cm. (pic. 7)}. Remove the fuse holder taking care to remove the fuse. Fix the fuse holder’s base. Cut the red power cable between 10 and 40cm. (maximum) from the battery (pic. 7). Keep the remaining scrap cable that will be used to link the other fuse extremity to the positive terminal of the fuse holder (+) of the vehicle battery. Strip 1cm (pic. 3), then tin it. Screw the cable to the holder base terminal. Collect the remaining scrap cable. Strip 1cm (pic. 3), then tin it. Screw the cable to the other holder base terminal.

WARNING:
Do not open the amplifier, nor make any modifications to the products. There’s a risk of accident, fire or electric shock.
Tin the end of the power supply cable before you connect it to the battery’s positive (+) terminal. Weld the end of the cable to the terminal lug that is going to be used for the battery’s positive (+) terminal. Connect the terminal lug to the battery’s positive terminal.
Insert the fuse into the fuse-holder(s), and screw in tightly.
The Loudspeakers
Connect the loudspeaker cables to the right and left channel crossover networks, making sure that the polarities are the same (note: + = cable with a red border if you are using a Focal kit) as those used for standard wiring set-ups. Focal amplifiers can work in bridged mode (see product specifications page 29 to know the power delivered in bridged mode) for amplifying subwoofers go right here. To do so, simply connect the positive (+) speaker cable to the BRIDGE (+) terminal and connect the negative (-) speaker cable to the related BRIDGE (-) terminal.
WARNING
When connecting several subwoofers to the same output, check for the amplifier impedance compatibility.
Installation test
The connection phase is now complete. But, you must check if the power supply is correct as well as the correct operation of the full system (car radio/amplifier/loudspeakers). Set all gains (source, amplifier) to their minimum. Turn on the different elements. Once all the elements are on, carry out a test at low volume, adjusting the various gains.
Comments 18
I simply want to say I am all new to blogging and definitely savored this blog site. More than likely I’m likely to bookmark your blog . You amazingly have outstanding stories. Appreciate it for revealing your web-site.
I constantly spent my half an hour to read this blog’s articles or reviews everyday along with a
mug of coffee.
Great post. I was checking continuously this weblog and I’m
impressed! Extremely useful information particularly the
ultimate part 🙂 I care for such info much. I used
to be looking for this certain info for a very lengthy
time. Thanks and best of luck.
Thanks for the sensible critique. Me and my neighbor were just preparing to do some research about this. We got a grab a book from our area library but I think I learned more clear from this post. I am very glad to see such great info being shared freely out there.
I’m more than happy to discover this website. I need to to thank you for ones time for this
fantastic read!! I definitely appreciated every little bit of it and i also have you bookmarked to look at new things in your blog.
Does your blog have a contact page? I’m having trouble locating it but, I’d like to send you an e-mail.
I’ve got some creative ideas for your blog you might be interested in hearing.
Either way, great website and I look forward to seeing it develop over time.
Having read this I believed it was really informative. I appreciate you taking the time and energy to
put this content together. I once again find myself spending a significant amount of time both reading and commenting.
But so what, it was still worthwhile!
I was curious if you ever considered changing the page layout of
your blog? Its very well written; I love what youve got to
say. But maybe you could a little more in the way of content so people could connect with it better.
Youve got an awful lot of text for only having one or two images.
Maybe you could space it out better?
What’s up to all, the contents present at this site
are truly awesome for people knowledge, well, keep up the nice work fellows.
I truly love your blog.. Pleasant colors & theme.
Did you build this web site yourself? Please reply back as I’m looking to create my very own blog and want to know
where you got this from or exactly what the theme is named.
Many thanks!
Thanks for the feedback. I’m using the X-Theme, then I customized it. Thanks again
Wow that was odd. I just rote ann extremely long comment
but after I clickwd submit my comment didn’t show up.
Grrrr… wel I’m not writing all that over again. Anyway, just wanted to say fantastic blog!
Keep this going please, great job!
I am truly thankful to the holder of this web page who
has shared this enormous post at at this place.
Hello Web Admin, I noticed that your On-Page SEO is is missing a few factors, for one you do not use all three H tags in your post, also I notice that you are not using bold or italics properly in your SEO optimization. On-Page SEO means more now than ever since the new Google update: Panda. No longer are backlinks and simply pinging or sending out a RSS feed the key to getting Google PageRank or Alexa Rankings, You now NEED On-Page SEO. So what is good On-Page SEO?First your keyword must appear in the title.Then it must appear in the URL.You have to optimize your keyword and make sure that it has a nice keyword density of 3-5% in your article with relevant LSI (Latent Semantic Indexing). Then you should spread all H1,H2,H3 tags in your article.Your Keyword should appear in your first paragraph and in the last sentence of the page. You should have relevant usage of Bold and italics of your keyword.There should be one internal link to a page on your blog and you should have one image with an alt tag that has your keyword….wait there’s even more Now what if i told you there was a simple WordPress plugin that does all the On-Page SEO, and automatically for you? That’s right AUTOMATICALLY, just watch this 4minute video for more information at. Seo Plugin
Hi, alltech.co.ke admin how about finally earning
$1500-$2500/day without lifting a finger?
If making money online COULD be
as easy as writing your own check…
This might be it.
http://www.2000-usd-per-day.com/download.html
3 minutes into the video? Yep. That’s
a $10000-$15000/week, right there.
… All made with virtually no effort.
Watch it and see for yourself. Download and copy exact system for yourself here:
http://www.2000-usd-per-day.com/download.html
Your old friend Sophia
I see your page’s ranking is very low, it’s hard to find in search results.
You would double your traffic if you rank your page to top 10 results.
SEO become very hard nowadays, i know what can help you, simply search in google for:
Kelustu’s Tips Outsource The Work
Nice Website! BTW You can easily promote your business with “Power Promoter” it works perfectly for me.